Getting Started
HOW TO GET STARTED! **(DENTAL PRODUCT INSTRUCTIONS)**
HappySmile. Professional Tooth Whitening Made Easy.
This page will give you all the information you need to whiten
teeth the professional way. This is the complete guide to all that
you need to know to get started. Simply follow all these easy to
understand step-by-step instructions. If you need any further help or
support then please contact our customer services.
You MUST Keep All Dental Gels in the Fridge or Cool Place.
********************************
How the HappySmile Dental Procedure Works in (3) Easy Steps:
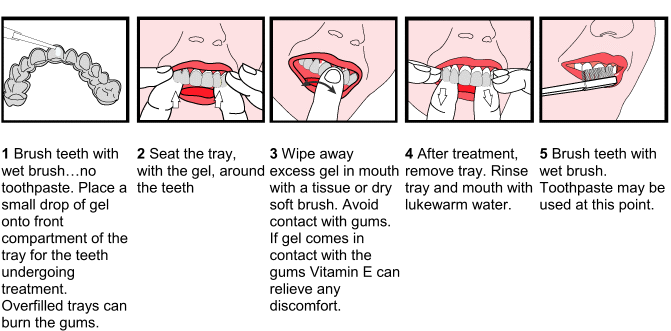
STEP 1.
HappySmile carbamide and hydrogen peroxide - twist off cap at the end of the syringe tip, save this cap to recap the syringe tip.
HappySmile Pro+ Calcium - pull off white syringe cap and twist on mixing tip. After use dispose mixing tip and replace syringe cap.
Apply an even dose of the whitening gel all around the
inside of the dental tray. (The inside of the tray that will go onto
your front of your teeth.)
STEP 2. Wear the dental tray for:
10% CP HappySmile – 2 hours
16%CP HappySmile – 1 hour
22% CP HappySmile – 30 Minutes
35% CP HappySmile – 10 Minutes (Very Fast) Can be worn up to 30 minutes.
6% HP HappySmile – 30 Minutes
9.5% HappySmile – 15 Minutes Can be worn up to 30 minutes.
27% Pro+ Calcium - 15 minutes - can be worn longer for additional calcium benefit.
(This dental procedure is done for 10 to 14 days if it is for a
new full course treatment.)
STEP 3. When you have finished wearing your dental trays then
simply take them out of your mouth and gently remove the gel from
your teeth using a soft tooth brush with water. You also want to use
the soft tooth brush to gently clean your dental trays to remove the
gel under a cold water tap and then you simply dry off your trays
with a clean tissue.
Please ensure you always use a soft toothbrush during the
professional tooth whitening procedure.
After this tooth whitening procedure you must only drink water or
milk and not to consume any food or smoke this is because the dental
enamel is still open and would re-stain.
Simply wait (2) hours and then you can carry on as normal.
When you follow these (3) easy steps you will soon restore your
teeth back to your natural whiteness!
____________________________________________
HappySmile Tooth Whitening Tips:
Do not rush treatment. Do not overload the trays with the gel.
Keep the dental gel stored in the fridge or cool place.
Do not use any type of mouth wash during the course of treatment.
If you get any gel onto the gums during treatment then simply
remove it with a wet cotton bud.
Sometimes you will find that during tooth whitening it can be
patchy where part of the enamel is not as white as the other part and
this is normal and will even out as you do a full course of
treatment.
Do remember that the professional dental bleaching effect does not
last for ever so you will need to apply more applications every 3
months or when needed. We supply smaller packs for top up treatments.
Lower strength gels take longer to whiten teeth than stronger
strength gels. Higher strength gels "speed" up the
procedure.
(Please contact our customer services department if you need any
more help and advice on HappySmile dental
products.)Thank you for
purchasing HappySmile Dental Products.
____________________________________________
HappySmile EZ Form Home Dental Trays:
HappySmile EZ Form Home Dental Trays:
Forms in hot water for a Custom Fit
Front tab for easy forming in warm water
BPA-free, PVC-free, Latex- free, no Phthalates
HappySmile EZ Trays are perfect as an instant dental bleaching tray that can be formed at home. We supply the original HappySmile EZ Trays that are known for the highest quality. You can also purchase a set of these whilst you are waiting to have your custom fit trays made by our dental lab. You will not find a better instant dental tray as these were developed to be used with dental peroxide.
HappySmile EZ Form Dental Tray Forming Instructions:
Brush and floss your teeth.
Heat a cup of water to the temperature of hot coffee or tea.
Dip the tray into the hot water (hot, not boiling) holding it by its tab.
When you see the tray start to droop, it is ready to be removed. Be careful when placing the tray into your mouth; do not allow it to fold.
Fitting Procedure;
Place tray over teeth and bite upper and lower teeth together. Press with the first three fingers of both hands against the front of the tray. Work rapidly as the tray will firm up fast.
With your tongue on the roof of your mouth and pushing on the back of the tray, suck all the air and water from the tray.
When the tray fits well, cut off the tab. Repeat this process for the other arch. (If proper fit is not achieved, the tray may be reheated and reformed.)
This tray can be used for all your whitening treatments. After each use, rinse with cool water.
